

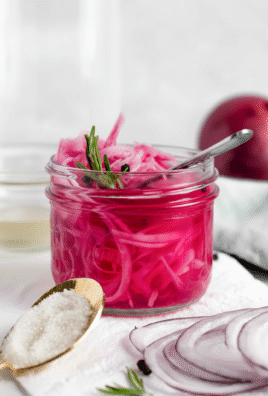
This pickled red onion recipe takes 10 minutes to make and turns ordinary meals into something special. You need just five ingredients – red onions, vinegar, water, sugar, and salt – plus a mason jar. The onions turn bright pink, stay crunchy, and last up to three weeks in your fridge. I make a fresh batch every week because my family puts them on everything from tacos to sandwiches.
I avoided making pickled onions for years because I thought they’d be complicated or require special canning equipment. Then I ordered fish tacos at a local restaurant, and those bright pink pickled onions on top changed everything. The tanginess cut through the richness of the fish, and they added this crunchy texture that made every bite better. That weekend, I looked up how to make them at home.
Turns out, this pickled red onion recipe might be the easiest thing I’ve ever made. No fancy equipment, no all-day process, no water bath canning. Just slice some onions, heat up a simple brine, pour it over, and wait. My first batch was ready in an hour, though they tasted even better the next day. Now I keep a jar in my fridge at all times, and I’m not exaggerating when I say we use them almost every day.
My husband puts them on his breakfast eggs. I pile them on salads and sandwiches. My kids (surprisingly) love them on quesadillas. They cost maybe two dollars to make, and one jar lasts our family about two weeks. If you’ve been buying pickled onions at the store or skipping them entirely because you didn’t know how easy they are to make, you’re about to have your mind blown.

What Makes This Pickled Red Onion Recipe Actually Work
I’ve tried different methods for pickling onions over the past few years. Some recipes had me standing at the stove for 20 minutes stirring constantly. Others used cold brine that took two full days before the onions were edible. A few resulted in onions that were either way too vinegary or strangely bland.
This pickled red onion recipe hits the sweet spot between quick and delicious. The hot brine method softens the onions just enough while keeping them crunchy. You get that tangy pickle flavor without the harsh raw onion bite that makes your breath terrible for hours.
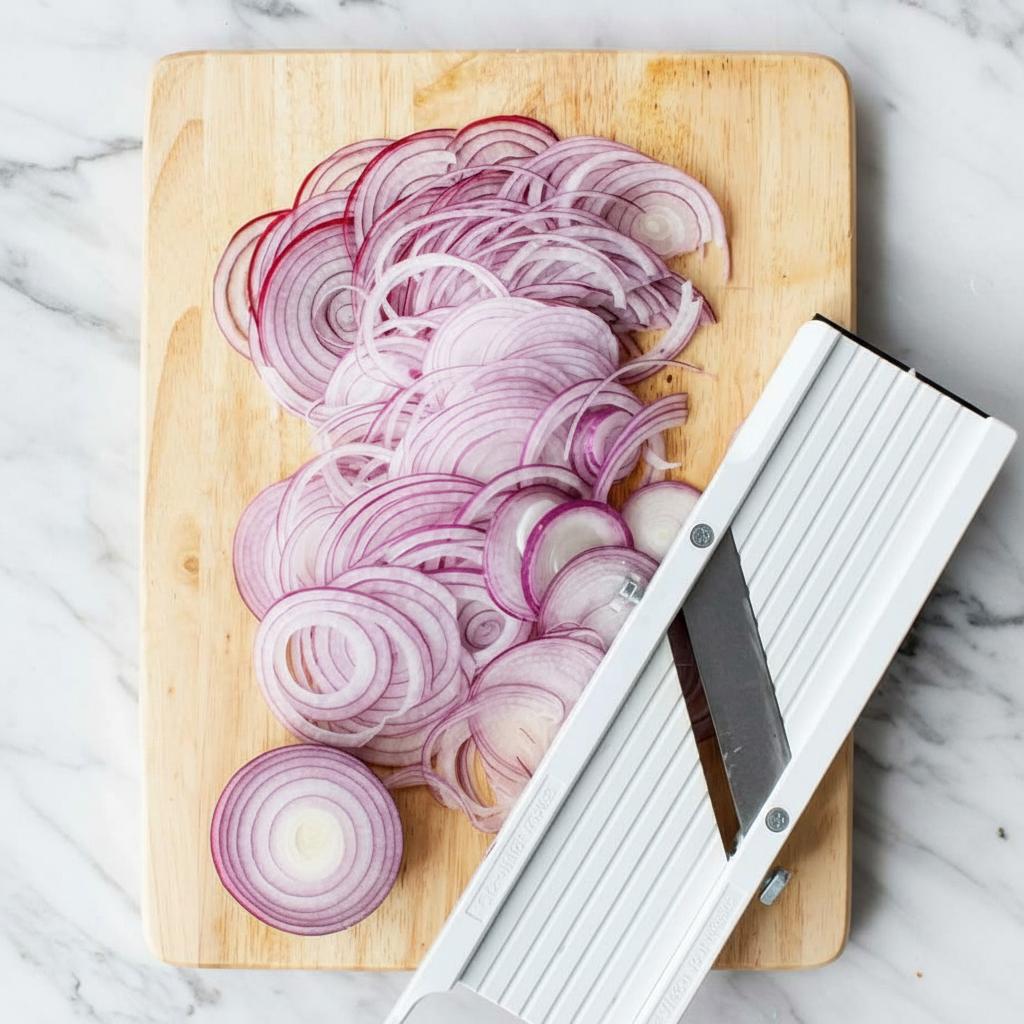
Slicing the onions super thin makes all the difference. When I first started making this pickled red onion recipe, I cut my onions about 1/4 inch thick because I thought thicker meant more crunch. Wrong. Those thick slices took forever to pickle, and even after two days in the fridge, they still tasted pretty raw in the middle. Now I slice them as thin as I possibly can – almost see-through if I can manage it. Thin slices are ready to eat in about an hour.
Heating the brine completely changed my results with this pickled red onion recipe. My very first attempt, I just mixed cold vinegar, water, sugar, and salt in a bowl and poured it over the onions. The sugar never fully dissolved, so it stayed grainy at the bottom of the jar. The onions stayed harsh and sharp-tasting, and the brine looked cloudy. Once I started heating the mixture on the stove until everything dissolved completely, the flavors blended smoothly and the onions turned that gorgeous bright pink color within minutes.
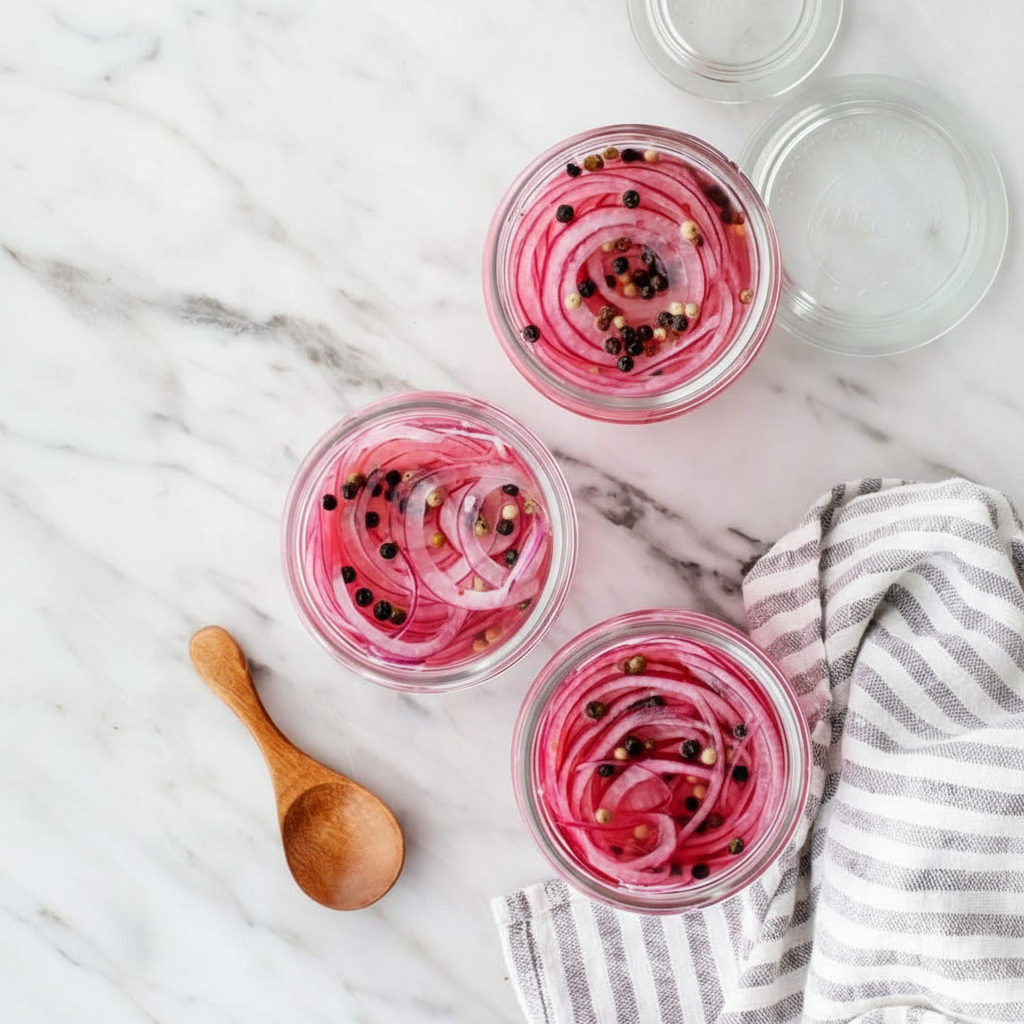
The pink color thing is actually really cool. Red onions contain these pigments called anthocyanins. When they hit the acidic vinegar in this pickled red onion recipe, a chemical reaction happens and they turn this vibrant hot pink color. It’s like watching a magic trick. My kids love watching me pour the hot brine over the onions just to see them change color instantly.
How Do You Make Pickled Red Onions?
Making this pickled red onion recipe involves five simple steps, and none of them are difficult.
Slice your onions as thin as possible. Peel one large red onion and cut it in half through the root end. Now slice each half as thinly as you can manage. I bought a cheap mandoline slicer on Amazon for about fifteen bucks, and it’s completely changed how I make this pickled red onion recipe. What used to take me ten minutes with a knife now takes about 30 seconds. The slices come out perfectly uniform, which means they all pickle at the same rate.
If you’re using a knife, that’s completely fine. Just take your time and try to keep the slices as even as possible. A really sharp knife helps a lot. Dull knives slip on the onion skin and make uneven cuts, plus they’re more dangerous because you have to press harder.
Here’s a trick Gordon Ramsay taught me through his videos: don’t cut off the root end of the onion right away. That root contains most of the sulfuric compounds that make you cry when you cut onions. If you cut the onion in half through the root and peel it first, then slice from the top toward the root, you’ll cry way less. I used to stand at my cutting board with tears streaming down my face. Now I barely tear up at all when making this pickled red onion recipe.
Pack your jar full of onions. Get a clean pint-sized mason jar and stuff all those onion slices in there. Don’t be shy about packing them in – they seem like they won’t all fit, but they will. The jar should look really full, almost overflowing. That’s perfect for this pickled red onion recipe because the onions shrink quite a bit once the hot brine hits them.
Make your brine on the stove. In a small saucepan, combine 3/4 cup of vinegar, 1/2 cup of water, 1-2 tablespoons of sugar, and 1 teaspoon of salt. I’ll give you exact measurements in the recipe card at the bottom, but honestly, this pickled red onion recipe is pretty forgiving with the ratios.
Put the pan on medium heat and stir constantly until you can’t see any sugar or salt crystals anymore. This takes about two minutes, maybe three if your stove runs cool. You want the mixture hot enough that everything dissolves completely, but you don’t need it boiling. Just hot and clear is perfect.
Pour the hot brine over your onions. This is the fun part of this pickled red onion recipe. Carefully pour that hot brine over the onions in your jar. Watch them turn from purple-red to bright pink right before your eyes. Make sure all the onion slices end up submerged under the liquid. If you see some sticking up above the brine, use a clean spoon to push them down.
Let everything cool, then refrigerate. Leave your jar sitting on the counter with no lid for about 30-45 minutes until it reaches room temperature. This step matters for this pickled red onion recipe because if you cap the jar while it’s still hot, steam gets trapped inside and your onions end up soggy instead of crunchy.
Once the jar feels cool to the touch, screw the lid on tight and stick it in your fridge. You can technically eat these pickled onions after about an hour, but they’re so much better if you can wait until the next day. The flavors need time to develop fully.
What Vinegar is Best for Pickling Red Onions?
These pickled red onions are the perfect topping for our Philly Cheesesteak Recipe. The acidity balances the richness of the melted cheese and beef beautifully.
People ask me about vinegar for this pickled red onion recipe more than anything else. The truth is that different vinegars give you completely different results, and there’s no single “best” option. It depends what you’re making the pickled onions for.
White vinegar is what most traditional recipes call for. It’s strong – usually 5-7% acidity – and has a clean, sharp flavor. The big advantage with white vinegar in this pickled red onion recipe is that it keeps your brine completely clear, which lets that gorgeous pink onion color really stand out. The downside? White vinegar can taste pretty harsh if you use too much. That’s why most recipes cut it with water.
I don’t use straight white vinegar much anymore for this pickled red onion recipe because I find it too aggressive. But if you’re making pickled onions for something where you want that really strong pickle punch – like on a rich pulled pork sandwich – white vinegar is your friend.
Apple cider vinegar has become my go-to for this pickled red onion recipe. It’s got this subtle sweetness that balances really nicely with the sugar in the brine. The flavor is much more mellow than white vinegar, and while the brine turns slightly amber instead of crystal clear, I think the trade-off is worth it for the better taste.
I buy apple cider vinegar with “the mother” (that’s the cloudy stuff you see floating in the bottle) because it contains probiotics. Regular filtered apple cider vinegar works fine too, though. Either way, apple cider vinegar gives you pickled onions that taste balanced and not overly sour.
Red wine vinegar creates the most dramatic color in this pickled red onion recipe. Instead of bright pink, you get deep magenta, almost purple onions. The flavor is richer and more complex than other vinegars. I use red wine vinegar when I’m making pickled onions specifically for a cheese board or to go with Mediterranean food. It’s got enough personality that it can stand up to strong-flavored foods.
Watch out with red wine vinegar, though – it can overpower delicate dishes. I wouldn’t put red wine vinegar pickled onions on fish tacos, for example. They’d be too much.
Rice vinegar is the mildest option for this pickled red onion recipe. It’s only about 4-5% acidity compared to other vinegars, and it’s naturally a bit sweet. If you find other vinegars too harsh or sour, rice vinegar is a great choice. It works beautifully for Asian-inspired dishes like bánh mì sandwiches or rice bowls.
Because rice vinegar is milder, you might want to use less water in your brine. I usually do 3/4 cup rice vinegar to 1/3 cup water instead of the standard 3/4 cup to 1/2 cup ratio.
White wine vinegar falls somewhere between white vinegar and apple cider vinegar in terms of flavor. It’s tangy without being aggressive, and it keeps your brine nice and clear. It’s a solid all-purpose choice for this pickled red onion recipe if you don’t want to fuss with different types.
What I actually do most of the time: I mix vinegars. Half apple cider, half white vinegar gives me the best of both worlds. I get the sweetness and mellowness of apple cider with the sharp tang of white vinegar. The result tastes really well-balanced, and the onions turn a beautiful bright pink.
But honestly? Use whatever vinegar you have in your pantry for this pickled red onion recipe. I’ve made batches with every type of vinegar, and they’ve all worked. Just avoid balsamic vinegar – it’s too thick and sweet and makes your pickled onions taste weird and syrupy.
How Long Should You Let Red Onions Pickle?
Timing for this pickled red onion recipe depends on how thick you cut your onions and how patient you can be.
Minimum time is 30 minutes to 1 hour. If you sliced your onions paper-thin, they’re technically ready to eat after about half an hour in the fridge. At this point, they’ll have that bright pink color, they won’t taste raw anymore, and they’ll have absorbed enough brine to be tangy. I usually can’t wait this long because I get too excited, so I’ll sneak a few out of the jar after 30 minutes just to taste them.
Are they amazing at the one-hour mark? Not really. They’re good, but they’re not great yet. They need more time for this pickled red onion recipe to reach its full potential.
Better timing is 2-4 hours. After sitting in the fridge for a few hours, your onions really start to shine. They get more tender, the flavors penetrate deeper into the onion layers, and that harsh bite that raw onions have completely disappears. This is my go-to timing if I’m making them in the morning to use for dinner.
Best timing is overnight or 24 hours. This is when magic happens with this pickled red onion recipe. After a full night in the fridge, the onions have completely absorbed all the flavors from the brine. They’re still crunchy – that satisfying crisp texture – but they’re tender enough to bite through easily. The tanginess has mellowed out and blended with the sweetness from the sugar. Everything tastes perfectly balanced.
If you have the ability to plan ahead even a little bit, make your pickled onions the night before you need them. The difference between one-hour pickled onions and overnight pickled onions is huge. You’ll taste what I mean.
Maximum storage time is 2-3 weeks. Your pickled red onion recipe will keep in the fridge for up to three weeks, and they actually keep getting better over time. The flavor deepens and becomes more complex. After about two weeks, though, they start to lose some of that crispy crunch. They’re still delicious, just a bit softer.
If your brine starts looking cloudy or your onions start smelling off at any point, throw them out and make a fresh batch. Better safe than sorry.
One important note about thickness: if you sliced your onions thicker than paper-thin – like 1/4 inch slices – plan on giving them at least 4-6 hours, preferably overnight. Thicker slices take much longer to absorb the brine. If you eat them too soon, the outside tastes pickled but the inside still tastes raw. Not great.
How Does Gordon Ramsay Make Pickled Onions?
Gordon Ramsay makes pickled red onions by slicing them paper-thin with a mandoline, heating white vinegar with water, sugar, and salt until dissolved, then pouring the warm (not boiling) brine over the onions and letting them rest overnight for the best flavor. His method emphasizes uniform slicing, proper brine temperature, and patience – three things that make the difference between mediocre pickled onions and restaurant-quality ones.
I watched several Gordon Ramsay videos where he makes this pickled red onion recipe, and I picked up a few chef-level tricks that really improved my results.
His slicing technique is precise. Gordon is obsessed with getting every onion slice exactly the same thickness for this pickled red onion recipe. He uses a mandoline set to the thinnest possible setting, and he takes his time to make sure every slice is uniform. Why does this matter? Because even slicing means even pickling. You don’t end up with some pieces that are still raw and crunchy while others have gone completely soft and mushy.
I used to think this was just chef perfectionism, but after trying his method, I get it. When all your slices are the same thickness, they all reach peak deliciousness at the same time.
He always heats his brine. Gordon never uses cold brine for this pickled red onion recipe. He combines white vinegar, water, sugar, and sea salt in a saucepan and brings it to a gentle simmer – not a rolling boil, just hot enough that the sugar and salt dissolve completely and the liquid looks clear.
Then, and this is important, he lets it cool slightly before pouring it over the onions. He wants it warm, not scalding hot. If the brine is too hot, it cooks the onions and makes them soft instead of crisp. If it’s cold, the pickling process takes forever. Warm is the sweet spot for this pickled red onion recipe.
He’s big on patience. Gordon says you can eat your pickled onions after an hour if you absolutely have to, but overnight is when they’re at their best. After watching him talk about this in multiple videos, I started following his advice and waiting the full overnight period. He’s completely right – the difference is night and day. One-hour pickled onions taste like onions that have been sitting in vinegar. Overnight pickled onions taste like a completely different product.
He adds flavor boosters. Gordon’s base pickled red onion recipe is simple – onions, vinegar, water, sugar, salt. But he often throws in a couple of smashed garlic cloves and some mixed peppercorns to add extra dimension. The garlic gets pickled right along with the onions and tastes incredible. The peppercorns add this subtle spicy kick that makes the pickled onions more interesting.
I started doing this after watching his method, and now I almost always add two garlic cloves to my jar. My family loves the extra flavor.
His onion-cutting trick changed my life. Gordon has this technique for cutting onions that makes you cry way less. He never cuts the root end off the onion until he’s completely done slicing. The root holds the onion together and contains most of the sulfuric compounds that make your eyes water.
His method for this pickled red onion recipe: Cut the onion in half through the root. Peel off the papery skin. Slice from the top of the onion down toward the root, using the root as a handle to keep everything steady. Once you’ve sliced as much as you can, then and only then do you cut off and discard the root.
I used to cry every single time I made pickled onions. Now I barely tear up at all thanks to Gordon’s technique.
He preps his jars properly. Gordon always uses clean, sterilized jars for this pickled red onion recipe. You don’t need to do the whole boiling-water canning thing since these are refrigerator pickles, but making sure your jar is squeaky clean means your pickled onions will last longer and won’t develop any weird off flavors.
I run my jars through the dishwasher before using them, which gets them perfectly clean and hot. Works great.
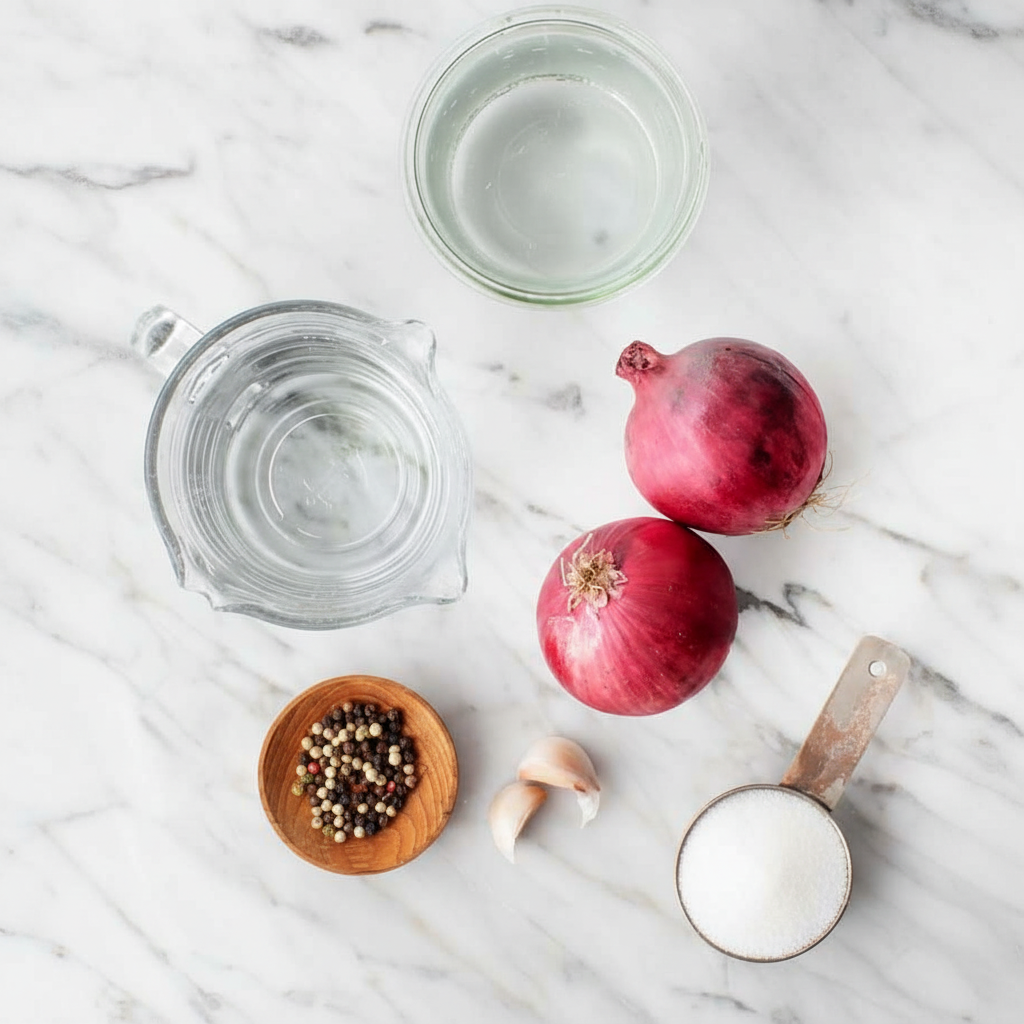
Everything You Need for This Pickled Red Onion Recipe
The ingredient list for this pickled red onion recipe is refreshingly short. You probably have most of these things in your kitchen already.
Red Onions
You need 1-2 large red onions, which will fill a pint-sized jar. Red onions are traditional for this pickled red onion recipe because they turn that gorgeous bright pink color when they hit the acidic vinegar. It’s a chemical reaction – the anthocyanins (pigments that make red onions purple-red) react with the acid and transform into bright pink.
Can you use other types of onions? Sure. Yellow onions, white onions, or sweet Vidalia onions all work fine for this pickled red onion recipe. They taste great, but they stay pretty much the same color – just slightly translucent. You lose that visual wow factor.
When buying red onions for this pickled red onion recipe, look for ones that feel heavy for their size with tight, papery skin. Avoid any with soft spots or that have started sprouting green shoots from the top.
Vinegar
You need 3/4 to 1 cup of vinegar. As I talked about earlier, apple cider vinegar is my personal favorite for this pickled red onion recipe, but use whatever you have. I like doing half apple cider vinegar, half white vinegar for the perfect balance of sweetness and tang.
Don’t buy “cleaning vinegar” by mistake – that stuff is way more concentrated than food-grade vinegar and will make your pickled onions inedible.
Water
This pickled red onion recipe uses 1/2 to 3/4 cup of water to dilute the vinegar. Straight vinegar would be overwhelmingly harsh and sour. The water mellows everything out and makes the pickled onions more versatile.
I use filtered water from my fridge, but tap water works fine if yours tastes good.
Sugar
We’re using 1-2 tablespoons of white granulated sugar. The sugar balances out the acidity from the vinegar and adds a subtle sweetness that makes these pickled onions really addictive. You can adjust this amount based on your taste – if you like them more tart, use 1 tablespoon. If you like them sweeter, use 2 tablespoons or even a bit more.
You can substitute honey, maple syrup, or agave for the sugar in this pickled red onion recipe. Just know that these natural sweeteners will cloud up your brine instead of keeping it clear. The onions still taste great, they just don’t look as pretty.
Salt
You need 1 teaspoon of salt. I use kosher salt because the larger crystals dissolve easily and taste clean. Sea salt works great too. Try to avoid iodized table salt if you can – it sometimes makes pickles taste a little metallic or chemical-y.
Optional Add-Ins to Customize Your Recipe
This is where you can get creative with your pickled red onion recipe:
- Garlic cloves (2-3, smashed): Adds a savory, pungent depth. The garlic gets pickled too and tastes amazing.
- Black peppercorns (1/2 teaspoon): Gives a subtle spicy kick without making things hot.
- Bay leaf (1 leaf): Adds an earthy, herbal background note.
- Red pepper flakes (1/4 teaspoon): Brings some heat if you like your pickled onions spicy.
- Fresh herbs (thyme, rosemary, oregano sprigs): Make your pickled onions aromatic and interesting.
- Whole spices (cumin seeds, coriander seeds, mustard seeds, fennel seeds): Let you customize the flavor profile for different cuisines.
I almost always throw in two smashed garlic cloves and a few peppercorns. My standard ratio for this pickled red onion recipe has become: onions, garlic, peppercorns, apple cider vinegar, and a touch of sugar. That’s my baseline, and then I’ll add other spices depending on what I’m planning to use the pickled onions for.
Step-by-Step: Making the Perfect Pickled Red Onion Recipe
Alright, let’s actually make these pickled onions. I promise this pickled red onion recipe is easier than it sounds.
Step 1: Prep Your Jar
Grab a clean pint-sized mason jar with a lid. Give it a good wash with hot soapy water, or run it through the dishwasher. You don’t need to sterilize it (we’re not canning these), but it should be clean.
Step 2: Slice the Onions
Peel your red onion and cut it in half through the root. Now slice it as thin as you can – aim for 1/8 inch or thinner. I use my mandoline set to the thinnest setting for this pickled red onion recipe, which gives me perfectly uniform slices in about 30 seconds. If you’re using a knife, take your time and try to keep the slices even.
Pack all the onion slices into your jar. It should look really full, maybe even overflowing a bit. That’s fine – the onions will shrink once the brine hits them.
Step 3: Make the Brine
In a small saucepan, combine 3/4 cup vinegar, 1/2 cup water, 1-2 tablespoons sugar, and 1 teaspoon salt. Place it over medium heat and stir constantly until the sugar and salt completely dissolve. This takes about 2 minutes. You’ll know it’s ready when the liquid looks clear and smooth.
You want the mixture hot, but you don’t need a rolling boil for this pickled red onion recipe. As soon as everything’s dissolved, take it off the heat.
Step 4: Pour and Cool
Carefully pour the hot brine over the onions in your jar. The onions will turn bright pink almost instantly – it’s so cool to watch. Make sure all the onions are submerged under the brine. If some are sticking out, push them down with a clean spoon.
Leave the jar uncapped on your counter and let it cool to room temperature. This usually takes about 30-45 minutes for this pickled red onion recipe.
Step 5: Refrigerate
Once the jar has cooled completely, screw on the lid and put it in the fridge. The onions are technically ready to eat after 30 minutes, but trust me – give them at least a few hours, or better yet, overnight.
That’s it! Your pickled red onion recipe is done. Seriously, that’s all there is to it.
Flavor Variations for Your Pickled Red Onion Recipe
Once you’ve mastered the basic pickled red onion recipe, it’s fun to play around with different flavor profiles. Here are my favorite variations:
Mexican-Style Pickled Red Onions
For this pickled red onion recipe variation, add 1/2 teaspoon each of cumin seeds and coriander seeds to the brine. Throw in a sliced jalapeño for heat, and use lime juice in place of half the vinegar. These are incredible on tacos, especially fish tacos.
Scandinavian-Style
Add fresh dill, caraway seeds, and black peppercorns to your pickled red onion recipe. Use white wine vinegar for a clean, bright flavor. Perfect on smoked fish, dark rye bread, or potato salad.
Asian-Inspired
Use rice vinegar and add a thin slice of fresh ginger to this pickled red onion recipe. You can also throw in a star anise pod if you’ve got one. These are fantastic on bánh mì sandwiches, rice bowls, or ramen.
Indian Spiced
Toast fennel seeds, coriander seeds, and a pinch of fenugreek in a dry pan until fragrant, then add to your pickled red onion recipe. Use white vinegar and add a curry leaf if you can find one. Amazing on naan bread, with curry, or on samosas.
Sweet and Spicy
Add 1/4 teaspoon red pepper flakes and increase the sugar to 3 tablespoons in this pickled red onion recipe. The sweet-heat combo is addictive on burgers and pulled pork sandwiches.
How to Use Your Pickled Red Onions
This is the fun part – figuring out all the ways to use this pickled red onion recipe. Here are my top 20 serving ideas:
- Tacos – Fish, chicken, carnitas, whatever. Pickled onions make tacos sing.
- Burgers – Replace raw onions with pickled ones for way more flavor.
- Sandwiches – Any sandwich. Seriously. BLT, turkey, grilled cheese, you name it.
- Avocado toast – This pickled red onion recipe takes avocado toast from good to restaurant-quality.
- Grain bowls – Quinoa, farro, rice bowls all benefit from that tangy crunch.
- Salads – Toss a handful into green salads, potato salad, or pasta salad.
- Pulled pork – The acidity cuts through the richness perfectly.
- Hot dogs – Trust me on this one. Life-changing.
- Cheese boards – They look pretty and taste amazing with aged cheddar or goat cheese.
- Eggs – Scrambled, fried, poached – pickled onions go with all of them.
- Pizza – Add them after the pizza comes out of the oven for a fresh pop.
- Quesadillas – Especially good with black bean quesadillas.
- Nachos – Better than jalapeños for topping nachos.
- Rice and beans – A classic Cuban combination.
- Falafel wraps – Essential for Middle Eastern wraps.
- Bánh mì – Traditional Vietnamese sandwich topping.
- Tuna or chicken salad – Chop them up and mix them in.
- Hummus or dips – Pile them on top for serving.
- Grilled vegetables – Especially good on roasted sweet potatoes.
- Straight from the jar – No judgment. I do it all the time.
The beauty of this pickled red onion recipe is that it’s so versatile. Any time you’d use raw onions, you can use pickled ones instead for way more flavor with none of that harsh raw onion bite.
Storage Tips for Your Pickled Red Onion Recipe
Taking care of your pickled red onion recipe properly means they’ll last longer and taste better.
Always keep them refrigerated. These are refrigerator pickles, not shelf-stable canned pickles. They need to stay cold. Don’t leave the jar out on the counter for hours – after you grab some onions, put the jar right back in the fridge.
Keep them submerged in the brine. The brine is what preserves the onions and keeps them from going bad. If your jar is getting low and the onions at the top aren’t covered, either eat them first or press them down so they’re submerged.
Use a clean fork or spoon. Every time you go into the jar for this pickled red onion recipe, use a clean utensil. Don’t stick your fingers in there or use a fork that’s been in your mouth. Cross-contamination can introduce bacteria and make your pickled onions spoil faster.
Watch for signs of spoilage. Your pickled red onion recipe should last 2-3 weeks in the fridge, but if you notice the brine getting cloudy, the onions getting slimy, or any funky smells, throw them out and make a fresh batch. Better safe than sorry.
Don’t freeze them. Freezing ruins the texture of pickled onions. They get mushy and weird when you thaw them. Just make fresh batches as you need them – it only takes 10 minutes.
Troubleshooting Common Problems
Even though this pickled red onion recipe is super simple, sometimes things don’t go quite right. Here’s how to fix the most common issues:
First Problem: My onions are too sour/vinegary. Solution: You used too much vinegar or not enough sugar. Next time, increase the water ratio or add another tablespoon of sugar to the brine. You can also rescue the current batch by draining some brine and adding fresh water with a bit of dissolved sugar.
Second Problem: My onions are still really harsh and sharp. Solution: They haven’t pickled long enough, or you sliced them too thick. Thin slices pickle faster. Give them more time in the fridge – at least overnight for this pickled red onion recipe.
Third Problem: My onions are mushy. Solution: Your brine was too hot when you poured it, or they’ve been sitting in the fridge too long. Make sure your brine has cooled slightly before pouring, and try to use your pickled onions within 2 weeks for best texture.
Fourth Problem: My brine is cloudy. Solution: Either your sugar didn’t dissolve completely, or bacteria has gotten in. If the brine was cloudy from day one, it’s probably undissolved sugar. If it turned cloudy after a week, toss the batch and start fresh.
Fifth Problem: My onions didn’t turn pink. Solution: You probably used white or yellow onions instead of red ones, or your onions weren’t fresh. Only red onions turn that gorgeous pink color in this pickled red onion recipe. Make sure you’re using fresh, firm red onions.
Health Benefits of Pickled Red Onions
Research from Harvard Health suggests that consuming vinegar may help with blood sugar regulation and digestion. Red onions are also packed with quercetin, a powerful antioxidant that, according to WebMD, supports heart health and may reduce inflammation. That’s why these pickled onions aren’t just delicious – they’re actually good for you!
This pickled red onion recipe isn’t just delicious – it’s actually pretty good for you too.
Probiotics: If you use raw, unfiltered apple cider vinegar with the mother, your pickled onions will have beneficial probiotics that support gut health.
Antioxidants: Red onions are loaded with anthocyanins and quercetin, powerful antioxidants that help fight inflammation and may reduce the risk of chronic diseases.
Low calorie: A quarter cup of pickled onions has only about 20-30 calories. They’re a great way to add tons of flavor to your food without adding many calories.
Digestive aid: The acidity from the vinegar can help with digestion, and the small amount of fermentation that happens as the onions sit in the brine creates enzymes that are easier on your stomach than raw onions.
Blood sugar: Some studies suggest that vinegar consumption can help regulate blood sugar levels, making this pickled red onion recipe a smart choice for people watching their glucose.
Heart health: Onions contain compounds that may help lower cholesterol and blood pressure. The vinegar in this pickled red onion recipe has been shown to have similar benefits.
Frequently Asked Questions About Pickled Red Onion Recipe
Q1: Can I use white or yellow onions instead of red onions for this pickled red onion recipe?
A: Yes, you absolutely can! White and yellow onions taste great pickled, they just won’t turn that gorgeous bright pink color. Red onions are traditional because they look so pretty, but if you only have white or yellow onions on hand, go for it.
Q2: Do I have to heat the brine for this pickled red onion recipe?
A: Technically no, but I highly recommend it. Heating the brine dissolves the sugar and salt completely and gives you a smoother, better-tasting pickle. It also helps the onions soften faster. Some people make “cold brine” pickled onions, but they take much longer to be ready.
Q3: Can I make this pickled red onion recipe without sugar?
A: Sure! The sugar balances the acidity and adds a subtle sweetness, but if you’re avoiding sugar, you can leave it out entirely or use a sugar substitute like erythritol or stevia. Your pickled onions will be more tart without the sugar.
Q4: How long does this pickled red onion recipe last in the fridge?
A: About 2-3 weeks in a sealed jar in the refrigerator. After that, the onions start to lose their crunch and the brine can get cloudy. If you notice any off smells or sliminess, toss them and make a fresh batch.
Q5: Can I reuse the brine from my pickled red onion recipe?
A: Yes! If you finish your pickled onions and still have brine left, you can use it to pickle more onions or other vegetables like carrots, radishes, or cucumbers. You can even use it in salad dressings or marinades for a tangy punch.
Q6: Why aren’t my pickled onions turning pink?
A: This usually means you used white or yellow onions instead of red ones, or your red onions weren’t very fresh. The pink color comes from anthocyanins in red onions reacting with the acid in the vinegar. Make sure you’re using fresh, firm red onions.
Q7: Can I add other vegetables to this pickled red onion recipe?
A: Absolutely! Carrots, radishes, jalapeños, cucumbers, and cauliflower all pickle beautifully with the same brine. You can mix them in with your onions or make separate jars.
Q8: Do pickled onions need to be kept in the fridge?
A: Yes! This pickled red onion recipe makes refrigerator pickles, not shelf-stable canned pickles. They must be kept refrigerated at all times to stay safe and fresh.
Q9: My pickled onions taste too vinegary. How can I fix them?
A: Drain off some of the brine and add fresh water with a bit of dissolved sugar. You can also just wait – the vinegar flavor mellows out over time as the onions sit in the fridge.
Q10: Can I make a big batch of this pickled red onion recipe?
A: Yes! Just multiply the recipe. The ratios stay the same. One large red onion fills a pint jar, so if you want to make a quart jar, use 2 onions and double the brine ingredients.
And there you have it – everything you could possibly need to know about making pickled red onions! This pickled red onion recipe has become one of my most-used kitchen staples. I make a new jar every week or two, and I’m constantly finding new ways to use them.
The beautiful thing about this recipe is how simple it is. No special equipment, no complicated techniques, no rare ingredients. Just onions, vinegar, a bit of sugar and salt, and 10 minutes of your time. But the impact these pickled onions have on your food? Huge. They turn ordinary meals into something special.
Start with the basic recipe I’ve given you, get comfortable with the technique, and then start experimenting. Try different vinegars, add spices, adjust the sweetness – make this pickled red onion recipe your own. Pretty soon, you’ll be the person always saying, “Hold on, these need pickled onions” every time someone makes tacos or burgers at your house.
Happy pickling! 🧅💗
PrintPickled Red Onion Recipe: Quick & Easy in Just 10 Minutes
This pickled red onion recipe makes bright pink, tangy, crunchy pickled onions in just 10 minutes of prep time. They’re perfect for topping tacos, sandwiches, salads, and more!
- Prep Time: 10 minutes
- Total Time: 1 hour 10 minutes
- Yield: 16 servings (1 pint jar) 1x
Ingredients
- 1–2 large red onions, thinly sliced
- 3/4 cup apple cider vinegar (or white vinegar, or a mix)
- 1/2 cup water
- 1–2 tablespoons white sugar (adjust to taste)
- 1 teaspoon kosher salt
- Optional: 2-3 garlic cloves, smashed
- Optional: 1/2 teaspoon black peppercorns
- Optional: 1 bay leaf
- Optional: 1/4 teaspoon red pepper flakes
Instructions
- Prep your jar: Wash a pint-sized mason jar with hot soapy water and dry it completely.
- Slice the onions: Peel your red onions and slice them as thinly as possible (about 1/8 inch or thinner). A mandoline makes this super easy, but a sharp knife works too. Pack the sliced onions into your clean jar. If using garlic, peppercorns, or other spices, add them to the jar now.
- Make the brine: In a small saucepan, combine the vinegar, water, sugar, and salt. Heat over medium heat, stirring constantly, until the sugar and salt completely dissolve (about 2 minutes). You want the mixture hot but not necessarily boiling.
- Pour and watch the magic: Carefully pour the hot brine over the onions in the jar. The onions will turn bright pink almost instantly! Make sure all onions are submerged. If needed, press them down gently with a clean spoon.
- Cool and store: Leave the jar uncapped on your counter until it cools to room temperature (about 30-45 minutes). Once cool, screw on the lid and refrigerate.
- Wait (or don’t): Your pickled onions are technically ready after 30 minutes, but they’re much better after a few hours or overnight. The longer they sit, the more tender and flavorful they become.
Notes
- Vinegar options: Apple cider vinegar is my favorite for this recipe, but white vinegar, rice vinegar, white wine vinegar, or red wine vinegar all work. You can also use a combination – half apple cider, half white vinegar is fantastic.
- Slicing tip: The thinner you slice your onions, the faster they’ll pickle and the crunchier they’ll stay. Use a mandoline if you have one for uniform, paper-thin slices.
- Sugar adjustment: Start with 1 tablespoon of sugar and taste the brine before pouring. If you want it sweeter, add another tablespoon. You can also substitute honey, maple syrup, or agave.
- Storage: Keep your pickled onions refrigerated in their jar with the brine. They’ll last 2-3 weeks in the fridge. Don’t freeze them – it ruins the texture.
- Flavor variations: Get creative! Add jalapeño slices for heat, cumin and coriander for Mexican flavors, or fresh dill for Scandinavian style.
- Uses: Pile these on tacos, burgers, sandwiches, salads, grain bowls, avocado toast, cheese boards, or eat them straight from the jar!
Nutrition
- Serving Size: Nutrition (per 2 tablespoon serving)
- Calories: 15 kcal
- Sugar: 2g
- Sodium: 140mg
- Fat: 0g
- Carbohydrates: 3g
- Fiber: 0g
- Protein: 0g
Leave a Comment